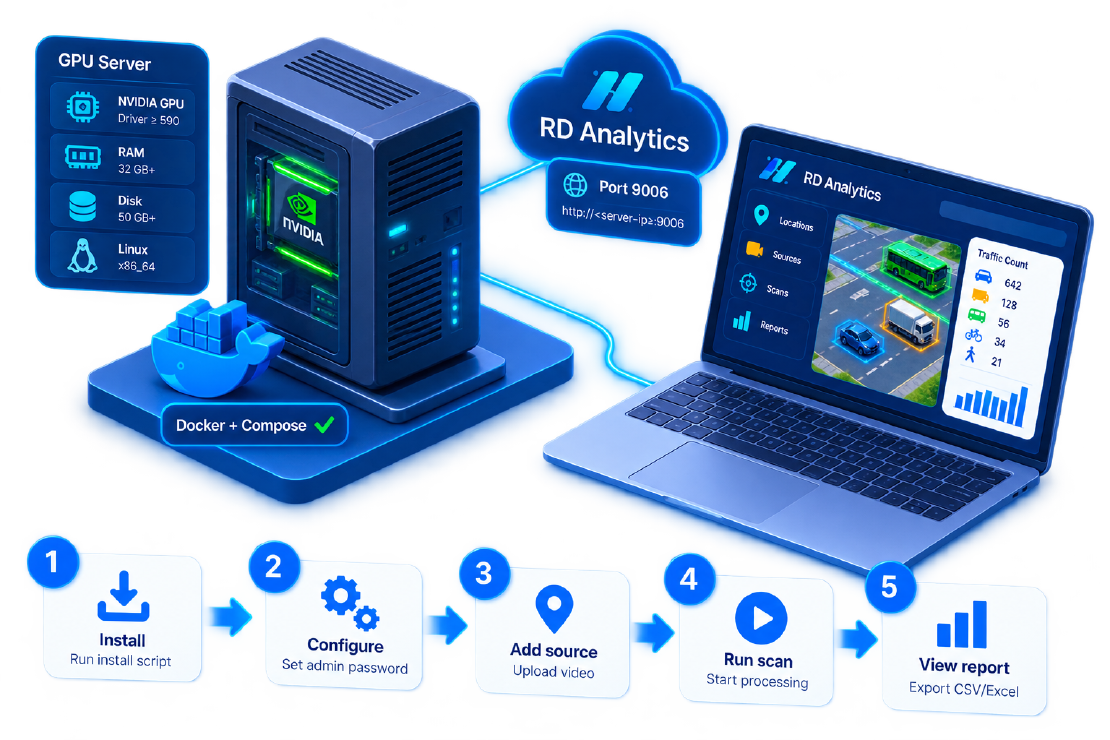
This guide is a practical on-ramp to install RD Analytics and reach your first report. It summarises traffic analytics hardware requirements and the install flow documented for RD Analytics 5.0.x. For production detail, always defer to the release’s Deployment notes shipped with your installer.
When you finish, you will have a running server, an admin login, and the workflow location → source → scan → report.
What you are installing
RD Analytics is a client–server package:
- Server (Linux): GPU engine + API + database + web UI
- Clients: any modern browser on Windows or macOS—no desktop app
Default web port: 9006. Users open http://<server-ip>:9006.
The package includes neural processing, storage, reporting, and the web stack. You supply the host, GPU, and cameras or video files.
Traffic analytics hardware requirements
Minimum viable survey host (typical)
| Item | Guidance |
|---|---|
| OS | Linux x86_64 |
| GPU | NVIDIA GPU with current driver (docs recommend ≥ 590) |
| Containers | Docker + Compose v2; NVIDIA Container Toolkit for GPU |
| RAM | ~32 GB recommended on GPU hosts |
| Disk | 50 GB+ free for images, media, TensorRT engines (plan more for video archives) |
| Network | LAN access for browsers; outbound only if using online install |
Exact GPU model sizing depends on resolution, module mix, and concurrent pipelines. Start with one solid GPU for PoCs; scale workers later (edge vs cloud).
Optional
- Extra disks or NAS for bulk video
- UPS for overnight batch processing
- Separate manager/worker hosts when you leave single-box mode
Preflight checklist
- BIOS / OS see the NVIDIA GPU (
nvidia-smiworks) - Host clock and timezone correct (reports depend on time ranges)
- Firewall allows browser access to TCP 9006 (and SSH for admins)
- You have the release install script or offline bundle from Road Data Systems
- You know who will own the admin password and backups
Install (online)
On the target host:
curl -fsSL https://dl.roaddatasystems.com/<product>/<version>/install.sh | sudo bash
Use the exact URL provided for your licence/release. Re-running with a newer release URL upgrades while preserving data and .env when present.
Install (offline)
- Copy
releases/<version>/to the machine. - Run:
sudo bash install.sh
What the installer does
- Preflight (architecture, disk, NVIDIA driver)
- Installs Docker + Compose if missing
- Creates data directories under
/opt/rd_analytics/data/ - Loads
rda-apiandrda-engineimages - Pulls MongoDB (
mongo:8.2in current docs) - Writes Compose files and a systemd unit (
rda-analytics) - On first install: creates
.env, initialises DB, prompts for admin password - Starts services (
docker compose up -d)
Install path: /opt/rd_analytics/. Enable on boot: systemctl enable rda-analytics.
Open http://<host-ip>:9006 and sign in with the admin account you just created.
First-hour configuration
1. System sanity
As sys-admin, open System:
- Confirm AI-Models you need are enabled
- Review Modules (detection, classes, tracker, outputs)
- Set class groups so reports use local labels
- Check Licensing matches purchased features (processing tier, optional modules, API)
- Note max pipelines (concurrent scans); changing it requires an engine restart
2. Users and zones
Create zones for projects or districts; assign engineers vs viewers. Viewers can browse locations without editing scans—useful for clients.
3. Run the quick-start workflow
- Locations — create
Demo Site - Sources — add a video file source; upload a short clip on the Files tab
- Scans — create a scan; in Draw settings, add a counting line; set status and start processing
- Wait until status is COMPLETED (investigate FAILED via troubleshooting docs if needed)
- Reports — create a report, link the scan, add quantity widgets, set time range, Apply
- Export CSV or Excel for a smoke-test deliverable
You have now exercised an RD Analytics install end-to-end.
Operations basics
| Topic | Practice |
|---|---|
| Upgrades | Re-run installer for new release URL; keep /opt/rd_analytics/compose/.env |
| Backups | Back up /opt/rd_analytics/data/ per your Deployment/backup guide |
| GPU engines | TensorRT caches under configured engine path (e.g. /opt/rd_analytics/data/trt_engines/) |
| Health | Use System Maintenance views for disk and pipeline load |
| API | After install, create keys for ETL (IoT integration) |
Common install issues
| Symptom | What to check |
|---|---|
| UI loads, scans fail on GPU | Driver / Container Toolkit / nvidia-smi inside runtime |
| Cannot reach UI | Firewall, bind address, correct port 9006 |
| Upload fails | Disk space on data volume; file format |
| Empty reports | Scan not COMPLETED; time range excludes data; click Apply |
| Licence errors on modules | Licensing tab vs optional module use |
Security notes for first deploy
- Change the admin password immediately; do not share it in chat logs
- Put the server on a management VLAN; expose 9006 only as needed
- Plan TLS termination (reverse proxy) for anything beyond a lab LAN
- Define video retention before the first real project lands
- Create named user accounts (engineer / viewer) instead of sharing admin
- Store API keys in a secret manager if you enable ETL early
Verify success in 30 minutes
After install, you should be able to tick:
-
nvidia-smishows the GPU; a test scan reaches COMPLETED - Home UI loads for admin; a second browser session works for a viewer role
- A report widget shows non-zero counts after Apply
- CSV export downloads
- Disk usage on
/opt/rd_analytics/data/is visible and has headroom
If any box fails, fix that before inviting project stakeholders—first impressions stick.
Next steps after installation
- Process a real junction clip and compare to a manual sample (Why AI Traffic Analytics Outperforms Manual Surveys)
- Add class depth and ped lines (Counting Vehicles & Pedestrians with Smart Video)
- Decide edge vs central topology before site two (Deploying RD Analytics on Edge vs Cloud)
Need a sized bill of materials or offline bundle? Contact Road Data Systems or start from the product page: RD Analytics.